
Passwords suck. People have been moaning about this for years, and it is becoming more and more apparent as we see high profile data and account breaches happen every day and the emerging necessity of services such as Have I Been Pwned and Pwned Passwords.
So, what’s the solution? FIDO2 (Fast Identity Online 2) seems a very strong candidate for a passwordless future or at the very least as a second factor, using public key cryptography to bring easy to use, unphishable credentials to the masses.

In this article, I’m going to talk through the basic ideas and concepts behind FIDO2, and then walk through a basic FIDO2 relying party proof of concept that I have created using ASP.NET Core.

FIDO2 for ASP.NET
As of September 2019, we now have a production-ready, FIDO certified implementation of FIDO2 for ASP.NET Core. Check out identityserver.com for more details.
FIDO2
FIDO2 is the evolution of the original FIDO UAF and U2F specifications that were created by Yubico and Google. Whereas U2F was only supported by Chrome & Opera, FIDO2 already has significant traction in all major browsers, with FIDO2’s primary contributors being Yubico and Microsoft.
The basic idea behind FIDO2 is to replace shared secrets, such as passwords, with public key cryptography.
With passwords, you and the application agree on a secret which the application then stores in a non-reversible format using a password hashing algorithm. Then, whenever you want to authenticate you simply supply the password which will in turn generate the same password hash that the application has stored, proving that you know the shared secret.
With FIDO, you hold a private key and upon registration give the website a public key. This key pair is unique to that application. Then, whenever you want to log in, you supply the application with an attestation signed using your private key, which the application can then verify using the public key you gave them, proving that you have the private key. Simple!
This credential style is essentially unphishable. If a malicious party steals the credential database, they will just receive the public keys, which are of no use to the attacker. If the malicious party impersonated the application and stole attestations from you, these would still be unusable thanks to each request and response needing to be linked (think state and nonce from OpenID Connect).
Combine this with the ability to bind credentials to a specific URL, and we find ourselves with some very compelling defenses against phishing attacks.
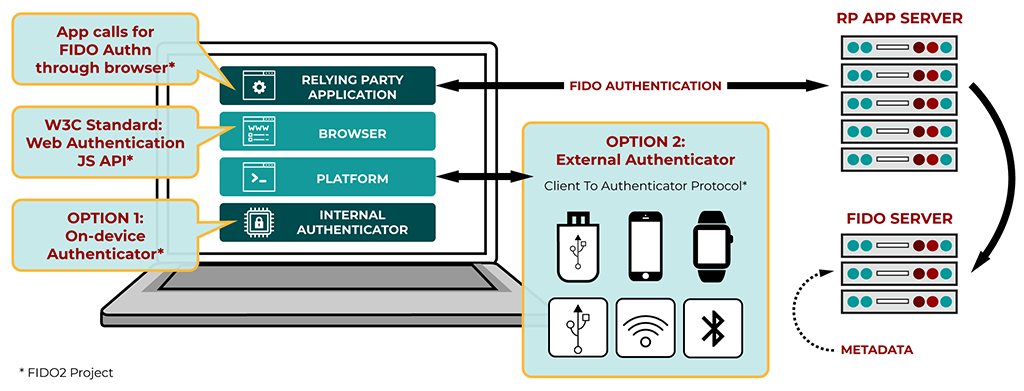
Behind the scenes, the FIDO2 project is actually comprised of two open standards: CTAP2 and WebAuthn.
WebAuthn
“Web Authentication: An API for accessing Public Key Credentials Level 1” (WebAuthn) is a W3C standardized API being built into all major browsers. This API allows your application to communicate with an authenticator, via the browser using a JavaScript API. This authenticator could be an external key, device biometrics, or even on-device software.
CTAP2
The Client to Authenticator Protocol (CTAP2) is a FIDO specification describing how an external FIDO authenticator can talk to a client (i.e. a browser). Private keys never leave the authenticator.
This spec is the domain of vendors like Yubico who create FIDO compliant authenticator devices, and not typically of the application developer.
What about U2F?
FIDO2 has backward compatibility with U2F (CTAP1) devices; however, the WebAuthn API should be used from here on out to communicate with these devices. Unlike U2F, FIDO2 isn’t constrained to any particular authenticator types; all that is required is that they integrate with the WebAuthn API.
What Makes FIDO2 Better than Alternatives?
FIDO2 authenticators differ themselves from smart cards mainly with the feature of “intent”. To use the authenticator, a user must be present and provide some sort of input to the device (e.g. simply touching the device). This prevents malware from triggering the authenticator without the user’s knowledge.
They then prove themselves above devices such as RSA tokens by being able to reuse one authenticator across multiple applications, and in a secure fashion. Comparing older hardware tokens to newer ones made by companies such as Yubico, we can see that fragility is also no longer an issue.
OTP as a second factor has had a decent adoption rate compared to alternatives; however, we are seeing more and more successful phishing attacks against OTP methods, whether it’s SMS (bad) or OTP apps such as Google Authenticator (better). While these attacks usual prey on the user themselves to give up the code to the attacker, a FIDO2 authenticator is unphishable; no matter what the attacker does or gets the user to do, they will not be able to steal their credentials.
ASP.NET Core Proof of Concept
To demonstrate the use of FIDO2, I’ve created a very simple website, acting as a Relying Party that communicates with the WebAuthn API. This application simply runs through the basic steps of registering a new authenticator and then verifying authentication assertions. It does not verify what kind of device the authenticator is; we are using Self Attestation.
You can find the working ASP.NET Core website that I’m experimenting with on GitHub. In this article I’ll be walking through the registration and verification steps with some of the meatier code snippets, detailing what I consider to be the required steps of acting as a FIDO2 relying party.

When developing the ASP.NET Core site, I used a Security Key by Yubico, which supports both U2F and FIDO2. When using WebAuthn, whether or not your key uses CTAP1 or CTAP2 won't really affect basic validation. I tested the app on Google Chrome version 67, and Firefox 61.
For various helper methods I used IdentityModel, and for handling CBORs I used the OSS CBOR library from peteroupc, mainly due to it being the only one I could find. I’d be interested to know if there are any alternatives. For a form post redirect triggered by JavaScript I used the jQuery.redirect library.
The code’s a little messy, and I had a play around with span, but it’s functional.
Working implementation: https://github.com/scottbrady91/Fido2-Poc.
Registration
WebAuthn
To register a new device, we first generate a challenge (a random string), set a Relying Party ID (RP ID), and state what type(s) of public key we would prefer (i.e. what algorithm it uses). I’ve also supplied a username and ID; however, you could have the authenticator generate a user handle.
The RP ID is the unique identifier for our application and will be associated with the private/public key pair created on our authenticator.
The relying party ID must be a valid domain string and must be either your application’s domain or a subdomain of its domain.
For example, if you are running on http://localhost:5000, then your RP ID would be localhost or something like fido.localhost.
The challenge and the RP ID are generated server side and securely stored for later usage by the server. We can then prepare this to be passed to the WebAuthn API in some JavaScript like so:
// Update challenge string to expected Uint8Array
var byteCharacters = atob("@Html.Raw(Model.Challenge)");
var byteNumbers = new Array(byteCharacters.length);
for (var i = 0; i < byteCharacters.length; i++) {
    byteNumbers[i] = byteCharacters.charCodeAt(i);
}
var challenge = new Uint8Array(byteNumbers);


// Request ES256 algorithm
var pubKeyCredParams = [{
        type: "public-key",
        alg: -7
    }];


// Relying party details
var rp = {
    name: "Test Site",
    id: "@Model.RelyingPartyId"
};


// User handle
var user = {
    name: "@Model.Username",
    displayName: "@Model.Username",
    id: new TextEncoder("utf-8").encode("@Model.Username")
};


var publicKey = { challenge, pubKeyCredParams, rp, user };
With this publicKey object, we can then call the WebAuthn APIs create method, posting the result to the server for processing:
navigator.credentials.create({ publicKey }).then(/* post to server*/);Registration Validation
From the registration request, we’ll receive the ID for the generated key and a result object containing an attestationObject, and clientDataJSON.
Note that these are both Base64 URL encoded (IdentityModel has handy helper methods for dealing with this).
Using this data, we’ll be parsing the clientDataJSON to check that the:
- type property is
webauthn.create - challenge property is equal to the challenge we issued as part of the registration request
- origin property matches the address of our website (e.g. “http://localhost:5000”)
We then CBOR decode the attestationObject, and, at a minimum, parse authData from it.
authData has a defined structure that we’ll need to parse manually:

authData Structure from W3C WebAuthn Specification.CBORObject cbor;
using (var stream = new MemoryStream(Base64Url.Decode(attestationObject)))
cbor = CBORObject.Read(stream);
var authData = cbor["authData"].GetByteString();
var span = authData.AsSpan();
var rpIdHash = span.Slice(0, 32); span = span.Slice(32);
var flags = new BitArray(span.Slice(0, 1).ToArray()); span = span.Slice(1);
var counterBuf = span.Slice(0, 4); span = span.Slice(4);
var counter = BitConverter.ToUInt32(counterBuf);The RP ID Hash is then compared against a hash of your RP ID, confirming the response was intended for you:
var hasher = new SHA256Managed();
var computedRpIdHash = hasher.ComputeHash(Encoding.UTF8.GetBytes(RelyingPartyId));
if (!rpIdHash.SequenceEqual(computedRpIdHash)) throw new Exception("Incorrect RP ID");
Whilst the Flags are then inspected bit by bit:
var userPresent = flags[0]; // (UP)
// Bit 1 reserved for future use (RFU1)
var userVerified = flags[2]; // (UV)
// Bits 3-5 reserved for future use (RFU2)
var attestedCredentialData = flags[6]; // (AT) "Indicates whether the authenticator added attested credential data"
var extensionDataIncluded = flags[7]; // (ED)
And for now, all we are going to care about is that the user was at least present.
The signature counter should be zero since this is a new key. We’ll want to store counter values alongside the credential for future use.
Now we need to parse the Attested Credential Data part of the authData:
// cred data - AAGUID (16 bytes)
var aaguid = span.Slice(0, 16); span = span.Slice(16);


// cred data - L (2 bytes, big-endian uint16)
var credIdLenBuf = span.Slice(0, 2); span = span.Slice(2);
credIdLenBuf.Reverse();
var credentialIdLength = BitConverter.ToUInt16(credIdLenBuf);


// cred data - Credential ID (L bytes)
var credentialId = span.Slice(0, credentialIdLength); span = span.Slice(credentialIdLength);
var coseStruct = CBORObject.DecodeFromBytes(span.ToArray());
var key = JsonConvert.DeserializeObject<CredentialPublicKey>(coseStruct.ToJSONString());
Here, we’re looking for the following structure:
[JsonProperty("1")]
public string KeyType { get; set; }


[JsonProperty("3")]
public string Algorithm { get; set; }


[JsonProperty("-1")]
public string Curve { get; set; }


[JsonProperty("-2")]
public string X { get; set; }


[JsonProperty("-3")]
public string Y { get; set; }
Note that this is currently hardcoded to only support ES256. If you request an RSA type key, then you will need to handle a couple of different parameters.
Once we have parsed the credentials, and once we confirm that the credential ID is not used by any other user, we can then store our new user, along with their new credentials.
There are extra checks involved around token binding, extensions, authenticator type assertions, etc. that have been omitted from this proof of concept. From what I can tell, the above is the bare minimum.
Authentication
WebAuthn
For authentication, we need to first find the user’s username, and in turn lookup their key ID. If the user had multiple keys, we might ask them which one they want to use. Homever, this would have required collecting some metadata about the authenticator at registration time so that we could allow the user to make an informed decision. For instance, they probably won’t know their relying party specific key ID but would know the colour & type of the authenticator or maybe be able to give it a nickname.
Once we’ve got a rough idea of who the user is and what key they are going to be using, we again create a challenge, and use our RP ID:
// Update challenge string to expected Uint8Array
var byteCharacters = atob("@Html.Raw(Model.Challenge)");
var byteNumbers = new Array(byteCharacters.length);
for (var i = 0; i < byteCharacters.length; i++) {
    byteNumbers[i] = byteCharacters.charCodeAt(i);
}
var challenge = new Uint8Array(byteNumbers);


// Update key ID string to expected Uint8Array
var raw = window.atob('@Html.Raw(Model.KeyId)');
var rawLength = raw.length;
var key = new Uint8Array(new ArrayBuffer(rawLength));


for (i = 0; i < rawLength; i++) {
    key[i] = raw.charCodeAt(i);
}


// Key details
var allowCredentials = [{
        type: "public-key",
        id: key,
        transports: ["usb"]
    }];


// Relying party details
var rpId = "@Model.RelyingPartyId";


var publicKey = { challenge, allowCredentials, rpId };
With this publicKey object, we can then call the WebAuthn APIs get method, posting the result to the server for processing (to control the user flow, I ended up using a form post redirect in the style of OpenID Connect and SAML):
navigator.credentials.get({ publicKey }).then(/* post to server*/);Authentication Assertion Validation
Our response from WebAuthn is like that of registration.
Again, we’ll receive the credential’s ID and clientDataJSON, but this time also an authenticatorData structure and a `signature`.
Again, these are base64 URL encoded.
In terms of validation, we first need to ensure the credential ID is the same as the one requested and again parse the clientDataJSON to check that the:
- type property is
webauthn.get - challenge property is equal to the challenge we issued as part of the authentication request
- origin property matches the address of our website (e.g. “http://localhost:5000”)
We then need to pick apart the authenticatorData.
This has a similar format as authData, but only has the RP ID hash, flags, and the signature counter.
var span = Base64Url.Decode(authenticatorData).AsSpan();
// RP ID Hash (32 bytes)
var rpIdHash = span.Slice(0, 32); span = span.Slice(32);


// Flags (1 byte)
var flagsBuf = span.Slice(0, 1).ToArray();
var flags = new BitArray(flagsBuf); span = span.Slice(1);
var userPresent = flags[0]; // (UP)
// Bit 1 reserved for future use (RFU1)
var userVerified = flags[2]; // (UV)
// Bits 3-5 reserved for future use (RFU2)
var attestedCredentialData = flags[6]; // (AT)
var extensionDataIncluded = flags[7]; // (ED)


// Signature counter
var counterBuf = span.Slice(0, 4); span = span.Slice(4);
var counter = BitConverter.ToUInt32(counterBuf);
Again, we check the RP ID Hash against the hash of our own, and that the user is at least present, just like in registration.
Verifying the Signature
Now it’s time for the trickier part: verifying the signature.
To verify the signature, we first need to recreate the data that was signed, and this is simply a concatenation of a SHA256 hashed clientDataJSON, and the authenticatorData.
var hasher = new SHA256Managed();
var hash = hasher.ComputeHash(Base64Url.Decode(clientDataJSON));


var a = Base64Url.Decode(authenticatorData);


var data = new byte[a.Length + hash.Length];
a.CopyTo(data, 0);
hash.CopyTo(data, a.Length);
Now we need to get our public key ready to verify the signature.
Since we are using ES256, we’ll need to configure an instance of ECDsa using the X & Y values that we received during registration:
var ecDsa = ECDsa.Create(new ECParameters
  {
      Curve = ECCurve.NamedCurves.nistP256,
      Q = new ECPoint
      {
          X = Base64Url.Decode(user.PublicKey.X),
          Y = Base64Url.Decode(user.PublicKey.Y)
      }
  });
And now the annoying part. Because I’m using a CTAP1 or CTAP2 device, that means that when using ECDSA based algorithms, the signature is encoded as an ASN.1 DER Ecdsa-Sig-Value.
I really struggled to find a way to decode this out of the box in C#, so I ended up decoding it manually. If you know of a better way of doing this, then please put me out of my misery and let me know. Thanks to one of Rock Solid Knowledge’s directors, Andrew Clymer, for helping me through this bit:
var s = Base64Url.Decode(signature);


var ms = new MemoryStream(s);
var header = ms.ReadByte(); // marker
var b1 = ms.ReadByte(); // length of remaining bytes


var markerR = ms.ReadByte(); // marker
var b2 = ms.ReadByte(); // length of vr
var vr = new byte[b2]; // signed big-endian encoding of r
ms.Read(vr, 0, vr.Length);
vr = RemoveAnyNegativeFlag(vr); // r


var markerS = ms.ReadByte(); // marker
var b3 = ms.ReadByte(); // length of vs
var vs = new byte[b3]; // signed big-endian encoding of s
ms.Read(vs, 0, vs.Length);
vs = RemoveAnyNegativeFlag(vs); // s


var parsedSignature = new byte[vr.Length + vs.Length];
vr.CopyTo(parsedSignature, 0);
vs.CopyTo(parsedSignature, vr.Length);
Where the method RemoveAnyNegativeFlag is checking for the presence of a signing bit and acting accordingly:
private byte[] RemoveAnyNegativeFlag(byte[] input)
{
    if (input[0] != 0) return input;

    var output = new byte[input.Length - 1];
    Array.Copy(input, 1, output, 0, output.Length);
    return output;
}
Once we have all of this setup, we can now verify the signature:
ecDsa.VerifyData(data, parsedSignature, HashAlgorithmName.SHA256);For a final check, we need to ensure that the signature counter is higher than the stored counter for that key. If the counter is higher, then all is good. If it is lower or equal to the counter we have stored, then this could be a sign that the authenticator has been cloned and should not be trusted.
Again, there are a whole load of other validation checks around authentication attestations regarding how trustworthy the device is and whether it meets your required assurance levels.
Source Code & Future
This proof of concept only scratches the surface of the features available in FIDO2; however, it goes to show how simple the WebAuthn API is, and how easy it is to start communicating with authenticators. Remember, these authenticators don’t need to be security keys; they could be private keys stored on your mobile and protected by your thumbprint.
Again, you can check out the proof of concept on GitHub: https://github.com/scottbrady91/Fido2-Poc.
I’m unsure if this proof of concept will evolve into something more, however, if you are interested in contributing to, funding, or even purchasing such a component, feel free to get in touch and we can discuss possibilities.
FIDO2 for ASP.NET
As of September 2019, we now have a production-ready, FIDO certified implementation of FIDO2 for ASP.NET Core. Check out identityserver.com for more details.