
Last week Google released an open-source FIDO2 authenticator called OpenSK, implemented in Rust.
OpenSK is not too dissimilar to the Solo Key, but unlike Solo, it is not yet suitable for everyday usage. It is not FIDO certified, and at the time of writing, it uses Rust implementations of the required cryptographic algorithms (e.g. ECDSA), as opposed to using available hardware-accelerated cryptography. For now, OpenSK is for research purposes only.
In this article, I’m going to talk through my creation of a security key using OpenSK (I am a Windows user, and this is all new to me). I’m also going to see how well the current implementation works with a FIDO conformant relying party (registration and authentication) such as FIDO2 for ASP.NET Core.
Creating Your OpenSK Authenticator
Hardware
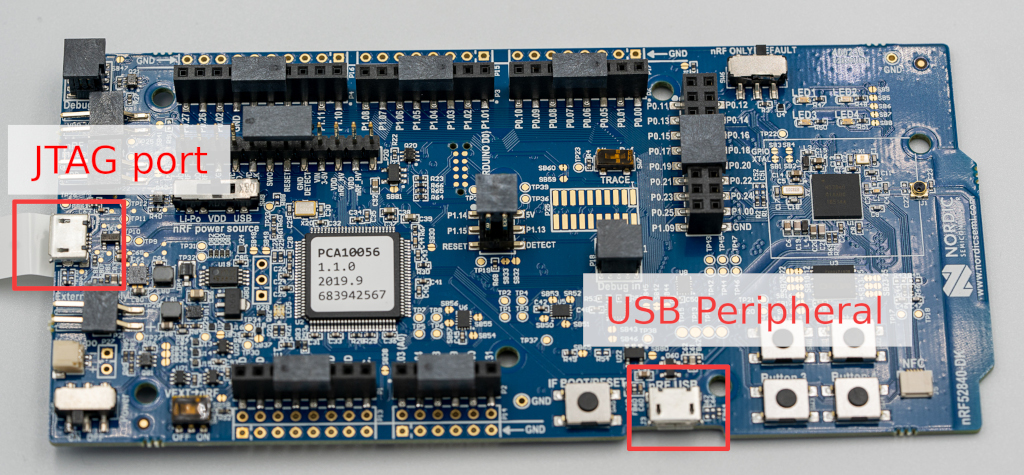
To create your security key, you’ll need something to install OpenSK on. I took the GitHub repo’s recommendation and bought a Nordic nRF52840 DK (Development Kit). You could buy the non-development kit version, which is an actual USB dongle; however, this requires you to purchase various probes, adaptors, and cables so that you can flash the USB.
The Nordic semiconductor website has a neat little connect & test walkthrough to get you started with your dev kit. I recommend you run through this before you continue.
Environment (WSL vs. VirtualBox)
OpenSK aim their installation instructions at non-Windows users, so I followed suit and used a Linux distro. I ended up using Ubuntu 18.04 running on a VirtualBox VM.
I did start by trying to use WSL; however, WSL is missing support for USB (libusb), which caught me out when it came time to flash my USB. I heard that WSL2 had USB support, but after joining the Windows Insider program and switching to WSL2, I still had no luck. If you can get this working, it would be an awesome follow-up blog post.
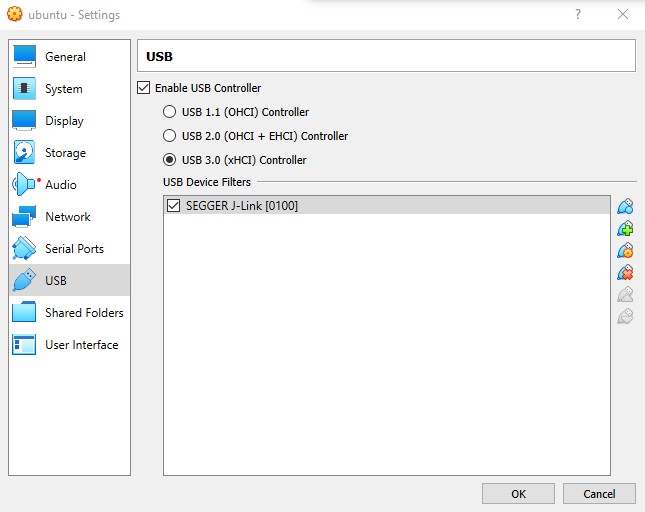
If you are using a VM, after you plug your USB into the board’s JTAG port, make sure that you make that USB device available to the VM. For me, the VM saw the board listed as "SEGGER J-Link". Once you start the VM, you may need to unplug the USB and then plug it back in to make the VM realize that it is there 🤷♂️.
JLinkExe
Now that your environment can see the board let’s install JLinkExe and update the board’s firmware. You can get JLinkExe by downloading and installing the J-Link Software and Documentation Pack from segger.com.
Once installed, run JLinkExe to have it update the firmware. You do not need to tell it anything about your board; it will automatically find it.
JLinkExeYou may need to sudo JLinkExe the first time around.
This process will cause the USB to disconnect from your environment.
In VirtualBox, I had issues getting the USB to automatically become visible again, which meant I got an error on Waiting for emulator to attach with an error message of Communication timeout. Emulator did not re-enumerate.
I got around this by simply manually enabling the USB device in VirtualBox during the “Waiting for emulator to attach” step (Devices > USB > SEGGER J-Link).
Once JLinkExe is working and has updated your board’s firmware, you can now move onto OpenSK specifics.
Preparing Your Environment with OpenSK
First, you’ll need to download OpenSK from GitHub. You can save this anywhere on your machine (it doesn’t go on the USB).
git clone https://github.com/google/OpenSK.gitYou can then run the setup script, which will handle Git submodules and download & patch any required dependencies. There are some prerequisites, but if you want to be lazy, the script will soon tell you what you are missing.
./setup.shFor my Ubuntu installation, I had to install pip3 (python3-pip) and rust. For rust, I had to set the path variable manually so that the rustup and cargo commands were available to the setup script.
Compiling OpenSK and Flashing Your Device
Now that our environment and board are ready, you can now compile OpenSK and flash your device. From my experience, this is where things can go a bit pear-shaped. If your device does not have Tock OS installed already (mine did not), specifying a supported board will cause OpenSK to install this for you.
board=nrf52840dk ./deploy.sh app os
For my installation, I had tockloader installed thanks to the OpenSK setup script, but I did not have the tockloader command available.
I was able to do this using PATH=$HOME/.local/bin:$PATH.
I also had issues with libssl-dev, which I was able to install using sudo apt install libssl-dev.
Using Your OpenSK Authenticator
Now that your authenticator is ready, you can remove the USB from the JTAG port and plug it into the development kit’s main USB port so that you can start using it. You may need to press the boot/reset button to see the device on your computer.
You can now test your new FIDO2 authenticator on sites such as fido.identityserver.com or webauthn.me.
The user presence light show.
When user presence is required, we get the above light show. To approve the request, press one of the four buttons below the LEDs.
The first time you use your security key, you’ll need to set a PIN. You’ll then use that PIN for future user verification challenges, providing multi-factor authentication from a single form-factor.
Unfortunately, it’s only during registration that I can get user verification to work. When I try and authenticate with the WebAuthn userVerification setting to anything other than “discouraged”, I can enter my PIN and prove my presence, but then it just stops. The error is occurring between Windows and the authenticator, so it’s beyond me what the issue is. I’ve opened up a ticket, so let’s see if it’s a bug or a Scott error™.
OpenSK as your Primary Security Key
It’s still early days for OpenSK. If you want to use an open-source security key today, stick with the FIDO certified Solo Key. However, it is interesting to see people like Google entering the space, and I’m looking forward to seeing how the project progresses.
For a first-timer, I wouldn’t say you could create an OpenSK authenticator for under £10 like some of the headlines were saying. I started costing up the necessary equipment, and I got near to £100 (without shopping around). It’s cheap enough to get started with a dev kit, it cost me about £35, but I doubt I’ll be carrying around my nRF52840 dev kit on my key chain. It looks cool though.
Learning how to set this up, from zero knowledge to a basic understanding of the necessary tooling, took me one flu-addled weekend. Your mileage may vary.