
IdentityServer3 is no longer supported. I highly recommend that you consider moving to IdentityServer4 or Duende IdentityServer.
In this post we will create a hybrid flow client and take advantage of some of the features Identity Server and the Microsoft Katana OpenID Connect middleware can offer.
Hybrid Flow
Along with creating an OWIN client, we'll also take the opportunity to play around with the hyrid flow and some basic authorization. This will require some changes to our Identity Server implementation.
Client
To create the necessary hybrid client, add the following client configuration:
new Client {
    ClientId = @"hybridclient",
    ClientName = @"Example Hybrid Client",
    ClientSecrets = new List<Secret> {
        new Secret("idsrv3test".Sha256())
    },
    Enabled = true,
    Flow = Flows.Hybrid,
    RequireConsent = true,
    AllowRememberConsent = true,
    RedirectUris = new List<string> {
        "https://localhost:44305/"
    },
    PostLogoutRedirectUris = new List<string> {
        "https://localhost:44305/"
    },
    AllowedScopes = new List<string> {
        Constants.StandardScopes.OpenId,
        Constants.StandardScopes.Profile,
        Constants.StandardScopes.Email,
        Constants.StandardScopes.Roles,
        Constants.StandardScopes.OfflineAccess
    },
    AccessTokenType = AccessTokenType.Jwt
}
You will also need to make sure that any new scopes are added to your Scopes store and that a user you want to test them with has a value for each (obviously, this does not apply for the offline access scope).
By adding the offline access scope we are now opening up the ability to request refresh tokens.
OWIN Client and Microsoft Katana OpenID Connect Middleware
Again, we'll start off with a basic ASP.NET MVC project, using the empty template and without any authentication user stores.
The following packages are necessary for this solution:
install-package Microsoft.Owin.Host.Systemweb
install-package Microsoft.Owin.Security.Cookies
install-package Microsoft.Owin.Security.OpenIdConnect
install-package IdentityModel
We'll use the same structure as our form post client, with the home page displaying the user claims and an account controller to authenticate our user. However, unlike our previous client, all we will need in the controller is the Authorize attribute for our Signin method. This will kick start the same login processes as the previous client, but with much less effort.
public class AccountController : Controller {
    [Authorize]
    public ActionResult SignIn() {
        return this.Redirect("/");
    }


    public ActionResult SignOut() {
        this.Request.GetOwinContext().Authentication.SignOut();
        return this.Redirect("/");
    }
}
If not logged in, this authorize attribute causes a 401 (Unauthorized) which the middleware we are about to implement will detect and 302 (Found) redirect to our IdentityServer login page.
To keep things simple, we will use the same views and partial views found in part 2 of this guide.
Startup
We'll start off with a similar OWIN startup class similar to that found in the previous post, with the added setting of the AntiForgeryConfig.
The UniqueClaimTypeIdentifier setting requires that all claims-based identities must return a unique value for that claim type.
This adjusts the anti-CSRF protection to use the sub claim and is necessary as a result of setting our inbound claim type map like we have.
Also set is the JwtSecurityTokenHandler's InboundClaimTypeMap.
By setting this to a new dictionary of string and string we are essentially clearing the mapper, allowing the JWT middleware to use the claim types that are sent by Identity Server, instead of it mapping them to the Microsoft XML schema types (for example we'll get name instead of http://schemas.xmlsoap.org/ws/2005/05/identity/claims/name).
We also need to set an application cookie using the Cookie OWIN middleware, allowing you to log actually log in to this application.
public void Configuration(IAppBuilder app) {
    AntiForgeryConfig.UniqueClaimTypeIdentifier = "sub";
    JwtSecurityTokenHandler.InboundClaimTypeMap = new Dictionary<string, string>();


    app.UseCookieAuthentication(new CookieAuthenticationOptions {
        AuthenticationType = "Cookies"
    });
}
Katana OpenID Connect Middleware
The Katana middleware is in charge of detecting when the user needs to be redirected to the OpenID Connect Provider and handling the subsequent interactions. This middleware will then log us in to our application as a result. The basic implementation of this is relatively self explanatory, with concepts you have already seen:
app.UseOpenIdConnectAuthentication(
    new OpenIdConnectAuthenticationOptions {
        ClientId = "hybridclient",
        Authority = IdServBaseUri,
        RedirectUri = ClientUri,
        PostLogoutRedirectUri = ClientUri,
        ResponseType = "code id_token token",
        Scope = "openid profile email roles offline_access",
        TokenValidationParameters = new TokenValidationParameters {
            NameClaimType = "name",
            RoleClaimType = "role"
        },
        SignInAsAuthenticationType = "Cookies"
    });
This simple startup class allows us to authenticate with our OpenID Connect Provider.
The Katana OpenID Connect middleware is configuring itself using the information you can find on our .well-known/openid-configuration endpoint.
All it wants from us is the OpenID Connect Provider base URL, the client ID, the redirect URL, scopes and response type.
And while we're at it we're telling the cookie to use our OpenID Connect claim types as the name and role claim.
Easy, eh?
Do note that the order you set the TokenValidationParameters and the SignInAsAuthenticationType does matter.
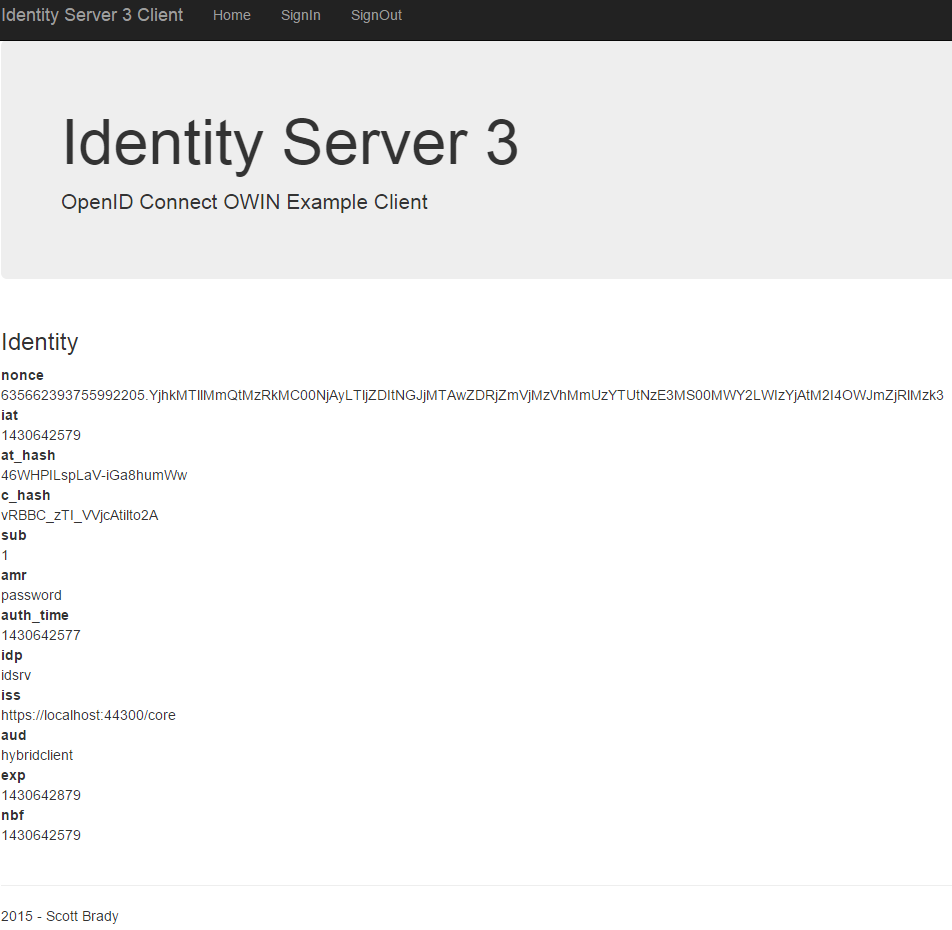
Returned claims from initial authentication.
Claims Transformation
Notice that we are not receiving any claims about the authenticated user. To retrieve these we will need to query the OpenID Connect UserInfo endpoint. You may have also noticed that we are also displaying a lot of weird and wonderful claims that the client application or user does not need to care about.
Using the Katana middleware we can easily map or remove the incoming claims to make things a bit more readable and concise, via claims transformation, and at the same time request some information about the authenticated user.
We do this after authentication, when we are notified that the Authorization Code has been received.
This is done by setting the Notifications property with an implementation of the OpenIdConnectAuthenticationNotifications class and intercepting the AuthorizationCodeReceived event.
Notifications = new OpenIdConnectAuthenticationNotifications {
    AuthorizationCodeReceived = async n => {
        var userInfoClient = new UserInfoClient(new Uri(UserInfoEndpoint), n.ProtocolMessage.AccessToken);
        var userInfoResponse = await userInfoClient.GetAsync();


        var identity = new ClaimsIdentity(n.AuthenticationTicket.Identity.AuthenticationType);
        identity.AddClaims(userInfoResponse.GetClaimsIdentity().Claims);


        n.AuthenticationTicket = new AuthenticationTicket(identity, n.AuthenticationTicket.Properties);
    }
}
Here we are using the UserInfoClient helper from the IdentityModel library to retrieve the user's claims and then creating a new ClaimsIdentity, keeping the AuthenticationType the same.
We are then populating this identity with any claims we want both from the existing ClaimsIdentity and then any claims we received from the userinfo endpoint.
We can then store these claims in our authentication cookie.
Refresh Tokens
To add support for long lived logins, we'll need get a refresh token from our authorization server. This refresh token can then be used to obtain fresh access tokens when the current one becomes invalid or expires. For more details on refresh tokens see the OAuth 2.0 spec.
We can include support for refresh tokens, once again using the Katana OIDC middleware in our authorization code callback.
var tokenClient = new TokenClient(TokenEndpoint, "hybridclient", "idsrv3test");
var response = await tokenClient.RequestAuthorizationCodeAsync(n.Code, n.RedirectUri);


identity.AddClaim(new Claim("access_token", response.AccessToken));
identity.AddClaim(new Claim("expires_at", DateTime.UtcNow.AddSeconds(response.ExpiresIn).ToLocalTime().ToString(CultureInfo.InvariantCulture)));
identity.AddClaim(new Claim("refresh_token", response.RefreshToken));
Here we are using another helper class from the IdentityModel library, this time TokenClient. This is used for simple handling of OAuth requests and is internally a wrapper around HttpClient.
By trading in our Authorization Code like this we receive a new access token and a refresh token along with it.
Post Logout Redirect
We've set post logout redirect urls within our Identity Server implementation and you may have noticed that a similar parameter is available in the OpenID Connect endsession endpoint. To use the post logout redirect we should also supply the previously issued ID token in order to give the OpenID Connect Provider some sort of idea about the current authenticated session.
We can do this using the Katana OIDC middleware by first persisting the incoming token and then attaching the it to the logout request.
To persist the ID token we will need to include it within the claims transformation of our AuthorizationCodeReceived notification.
nIdentity.AddClaim(new Claim("id_token", n.ProtocolMessage.IdToken));We can now pass the identity token back upon logout. This can be done using the RedirectToIdentityProvider notification seen below:
RedirectToIdentityProvider = n => {
if (n.ProtocolMessage.RequestType == OpenIdConnectRequestType.LogoutRequest)
{
var idTokenHint = n.OwinContext.Authentication.User.FindFirst("id_token").Value;
n.ProtocolMessage.IdTokenHint = idTokenHint;
return Task.FromResult(0);
}
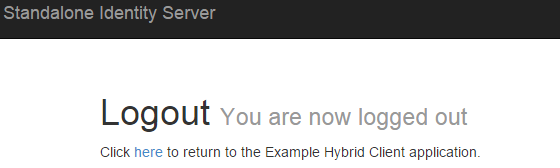
}Upon logout we will now be shown the following screen containing a link back to our client site:
We can skip this screen by adding the following property to our Identity Server implentation's IdentityServerOptions:
AuthenticationOptions = new AuthenticationOptions { EnablePostSignOutAutoRedirect = true }You can read up more on post logout redirects using the following sources:
- OpenID Connect Session Management 1.0 (Draft 26) - OpenId Connect draft specification for session management, including the detailed description of the endsession endpoint.
- IdentityServer v3 and "Post Logout Redirect" - Dominick Baier blog post on post logout redirects and why Identity Server 3 doesn't allow automatic redirects.
End Result
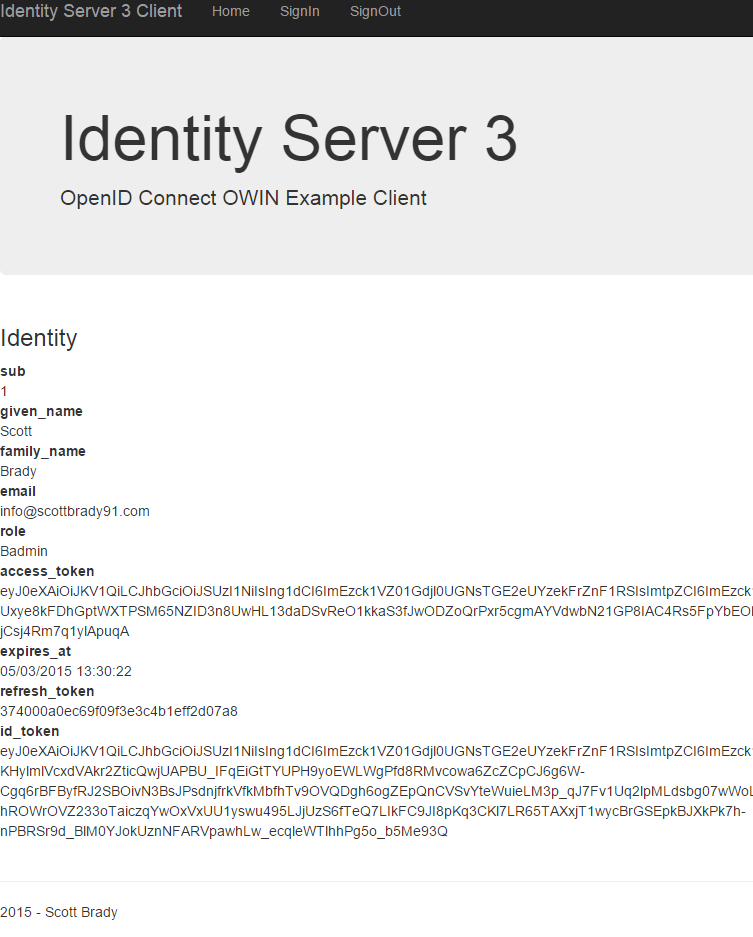
After all this we end up with the following claims:
Well that's authentication wrapped up! Up next is some basics on authorization and maybe even a Web API example. You can find all the source code used in this example client in my GitHub repository.
Links
- OWIN Katana Client Source Code - Source code for the OWIN Katana client demonstrated in this blog post
- IdentityServer Implementation Source Code - Source code for the IdentityServer implementation used by this client
- OpenID Connect Hybrid Flow and IdentityServer v3 - Dominick Baier blog post on using the hybrid flow with IdentityServer v3
Other articles in the series: