
Azure Key Vault is a great way to store your IdentityServer4 signing keys; it is secure, versioned, and gives you access to robust access control mechanisms. However, I keep seeing many Azure Key Vault integrations that miss many of its features by storing the private key as a secret and then downloading the private key on application startup.
In this article, I’m going to walk through an IdentityServer4 proof of concept in which the private keys never leave Azure Key Vault.
No private keys were downloaded in the making of this article.
Key Vault Configuration
First, you’ll need a private key, which you can create using Azure Key Vault:
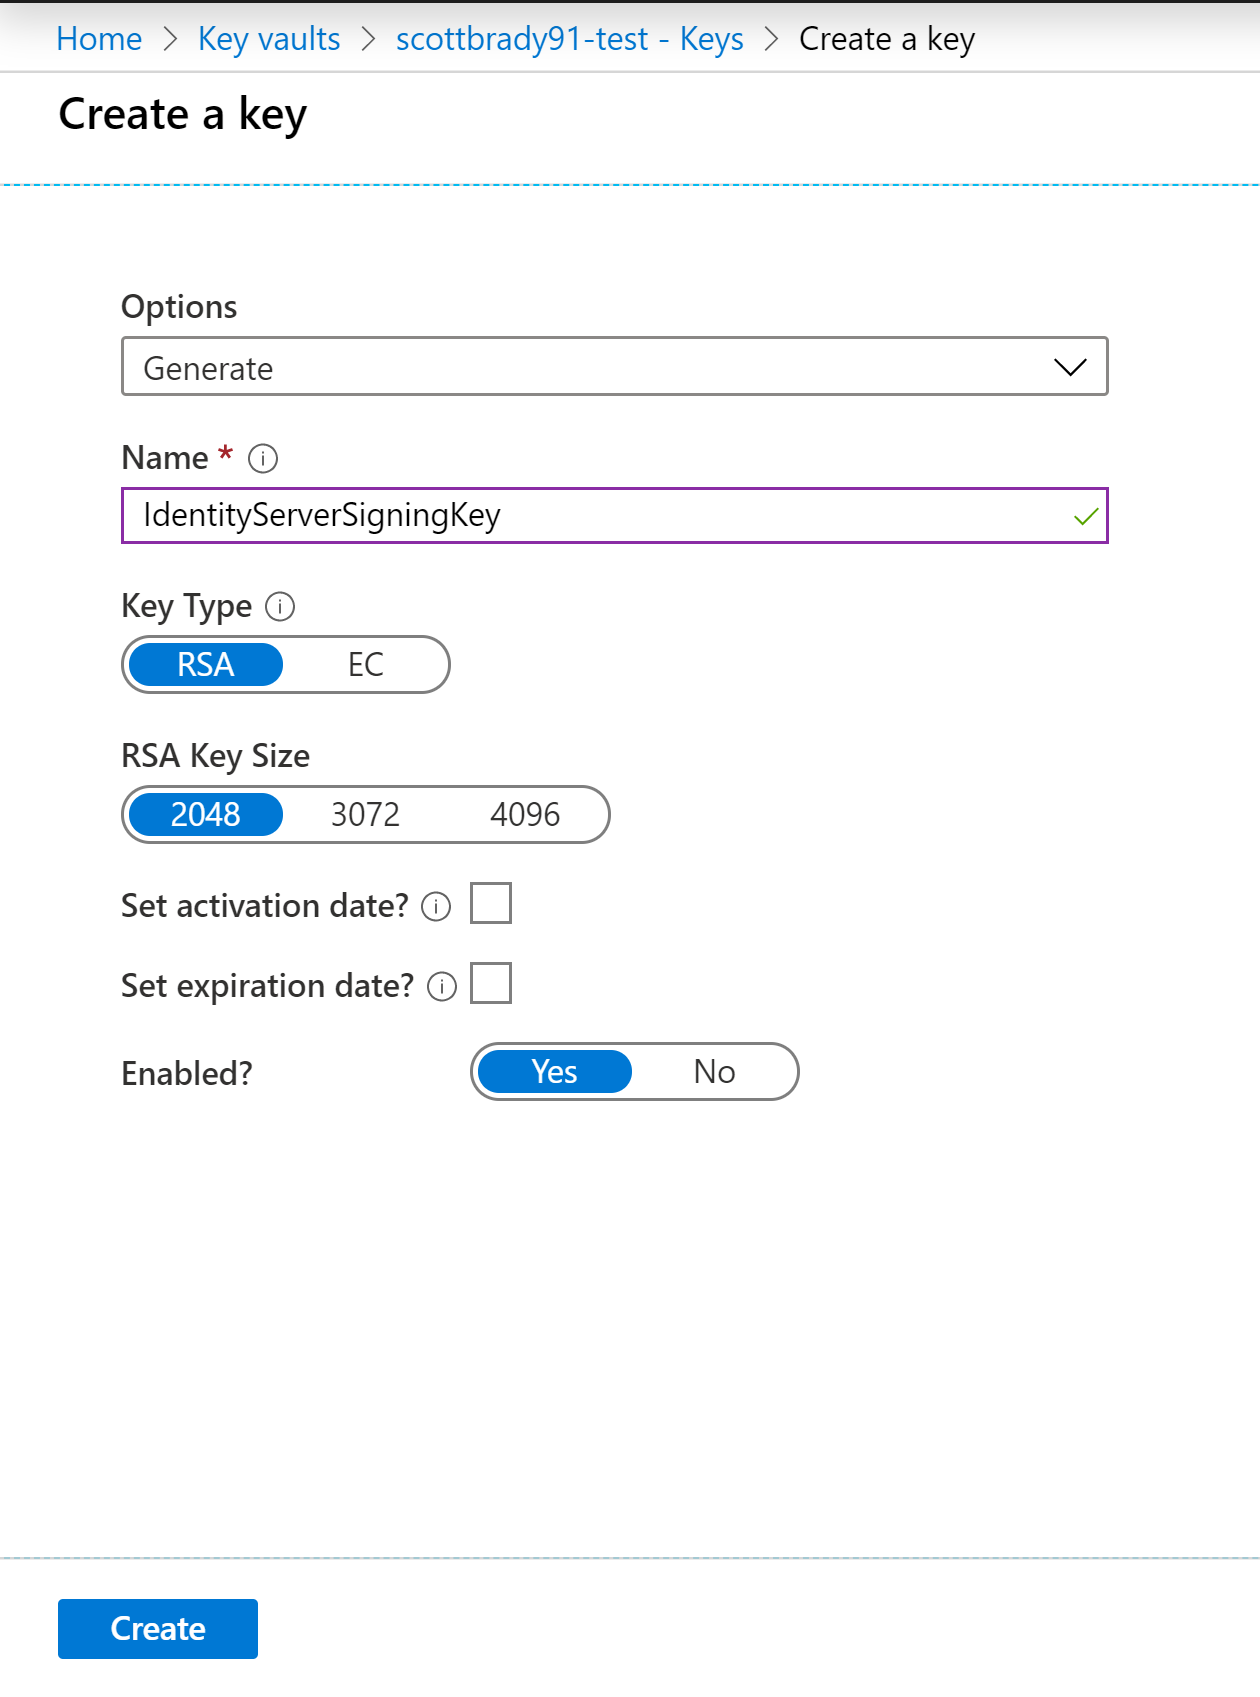
As of IdenityServer4 v3, you can use either RSA or EC keys. Feel free to scope down your RSA key’s “Permitted operations” to only be for signing and validation (which is the default for EC keys). Make a note of the key identifier; you’ll be revisiting this later.
Now you’ll need to configure an access policy so that one of your applications can access the key. You will need to authorize two key permissions:
- Key Management Operations: Get
- Cryptographic Operations: Sign
You will use the Get permission to load the public key for the JWKS endpoint and the Sign permission to sign tokens. I believe these permissions apply to all keys in the vault, so architect your vaults accordingly.
I’ll be using some OAuth client credentials in the following example code, but if you are deploying your IdentityServer implementation to Azure, consider using the Service Principal of your web app instead.
IdentityServer4 Token Signing
With your private key ready, you can now configure IdentityServer4 to use it. If you don’t already have an IdentityServer4 installation, I recommend you use the in-memory template or follow my getting started article.
For Key Vault integration, you’ll need the appropriate Azure Key Vault client library and the Azure authentication library. In this article, I’m using the v4 of the Azure Key Vault SDKs (new as of late 2019), which might look a little different from what you’re used to.
install-package Azure.Security.KeyVault.Keys
install-package Azure.Identity
Public Key
Before you start signing tokens, you’ll want to give IdentityServer4 a public key.
You can do this using the KeyClient class’ GetKey method and requesting the key by name.
var keyClient = new KeyClient(
    new Uri(""), // Vault URI, e.g: https://scottbrady91-test.vault.azure.net/
    new ClientSecretCredential(
        tenantId: "",
        clientId: "",
        clientSecret: ""));

Response<KeyVaultKey> response = keyClient.GetKey(""); // key name, e.g: IdentityServerSigningKey
This gives us access to the public key as a JSON Web Key (JWK). It should never give us the private key.
Using helper methods from the Azure Key Vault library, you can quickly turn this JsonWebKey object into .NET’s ECDsa or RSA objects and new up your security key. When using EC keys, you can figure out what the signing algorithm is, however with RSA keys, you’ll need to define what algorithm you want to use (e.g. RS256 or PS512). Here’s some code that I was playing around with:
AsymmetricSecurityKey key;
string algorithm;
if (response.Value.KeyType == KeyType.Ec)
{
ECDsa ecDsa = response.Value.Key.ToECDsa();
key = new ECDsaSecurityKey(ecDsa) {KeyId = response.Value.Properties.Version};
// parse from curve
if (response.Value.Key.CurveName == KeyCurveName.P256) algorithm = "ES256";
else if (response.Value.Key.CurveName == KeyCurveName.P384) algorithm = "ES384";
else if (response.Value.Key.CurveName == KeyCurveName.P521) algorithm = "ES521";
else throw new NotSupportedException();
}
else if (response.Value.KeyType == KeyType.Rsa)
{
RSA rsa = response.Value.Key.ToRSA();
key = new RsaSecurityKey(rsa) {KeyId = response.Value.Properties.Version};
// you define
algorithm = "PS256";
}
else
{
throw new NotSupportedException();
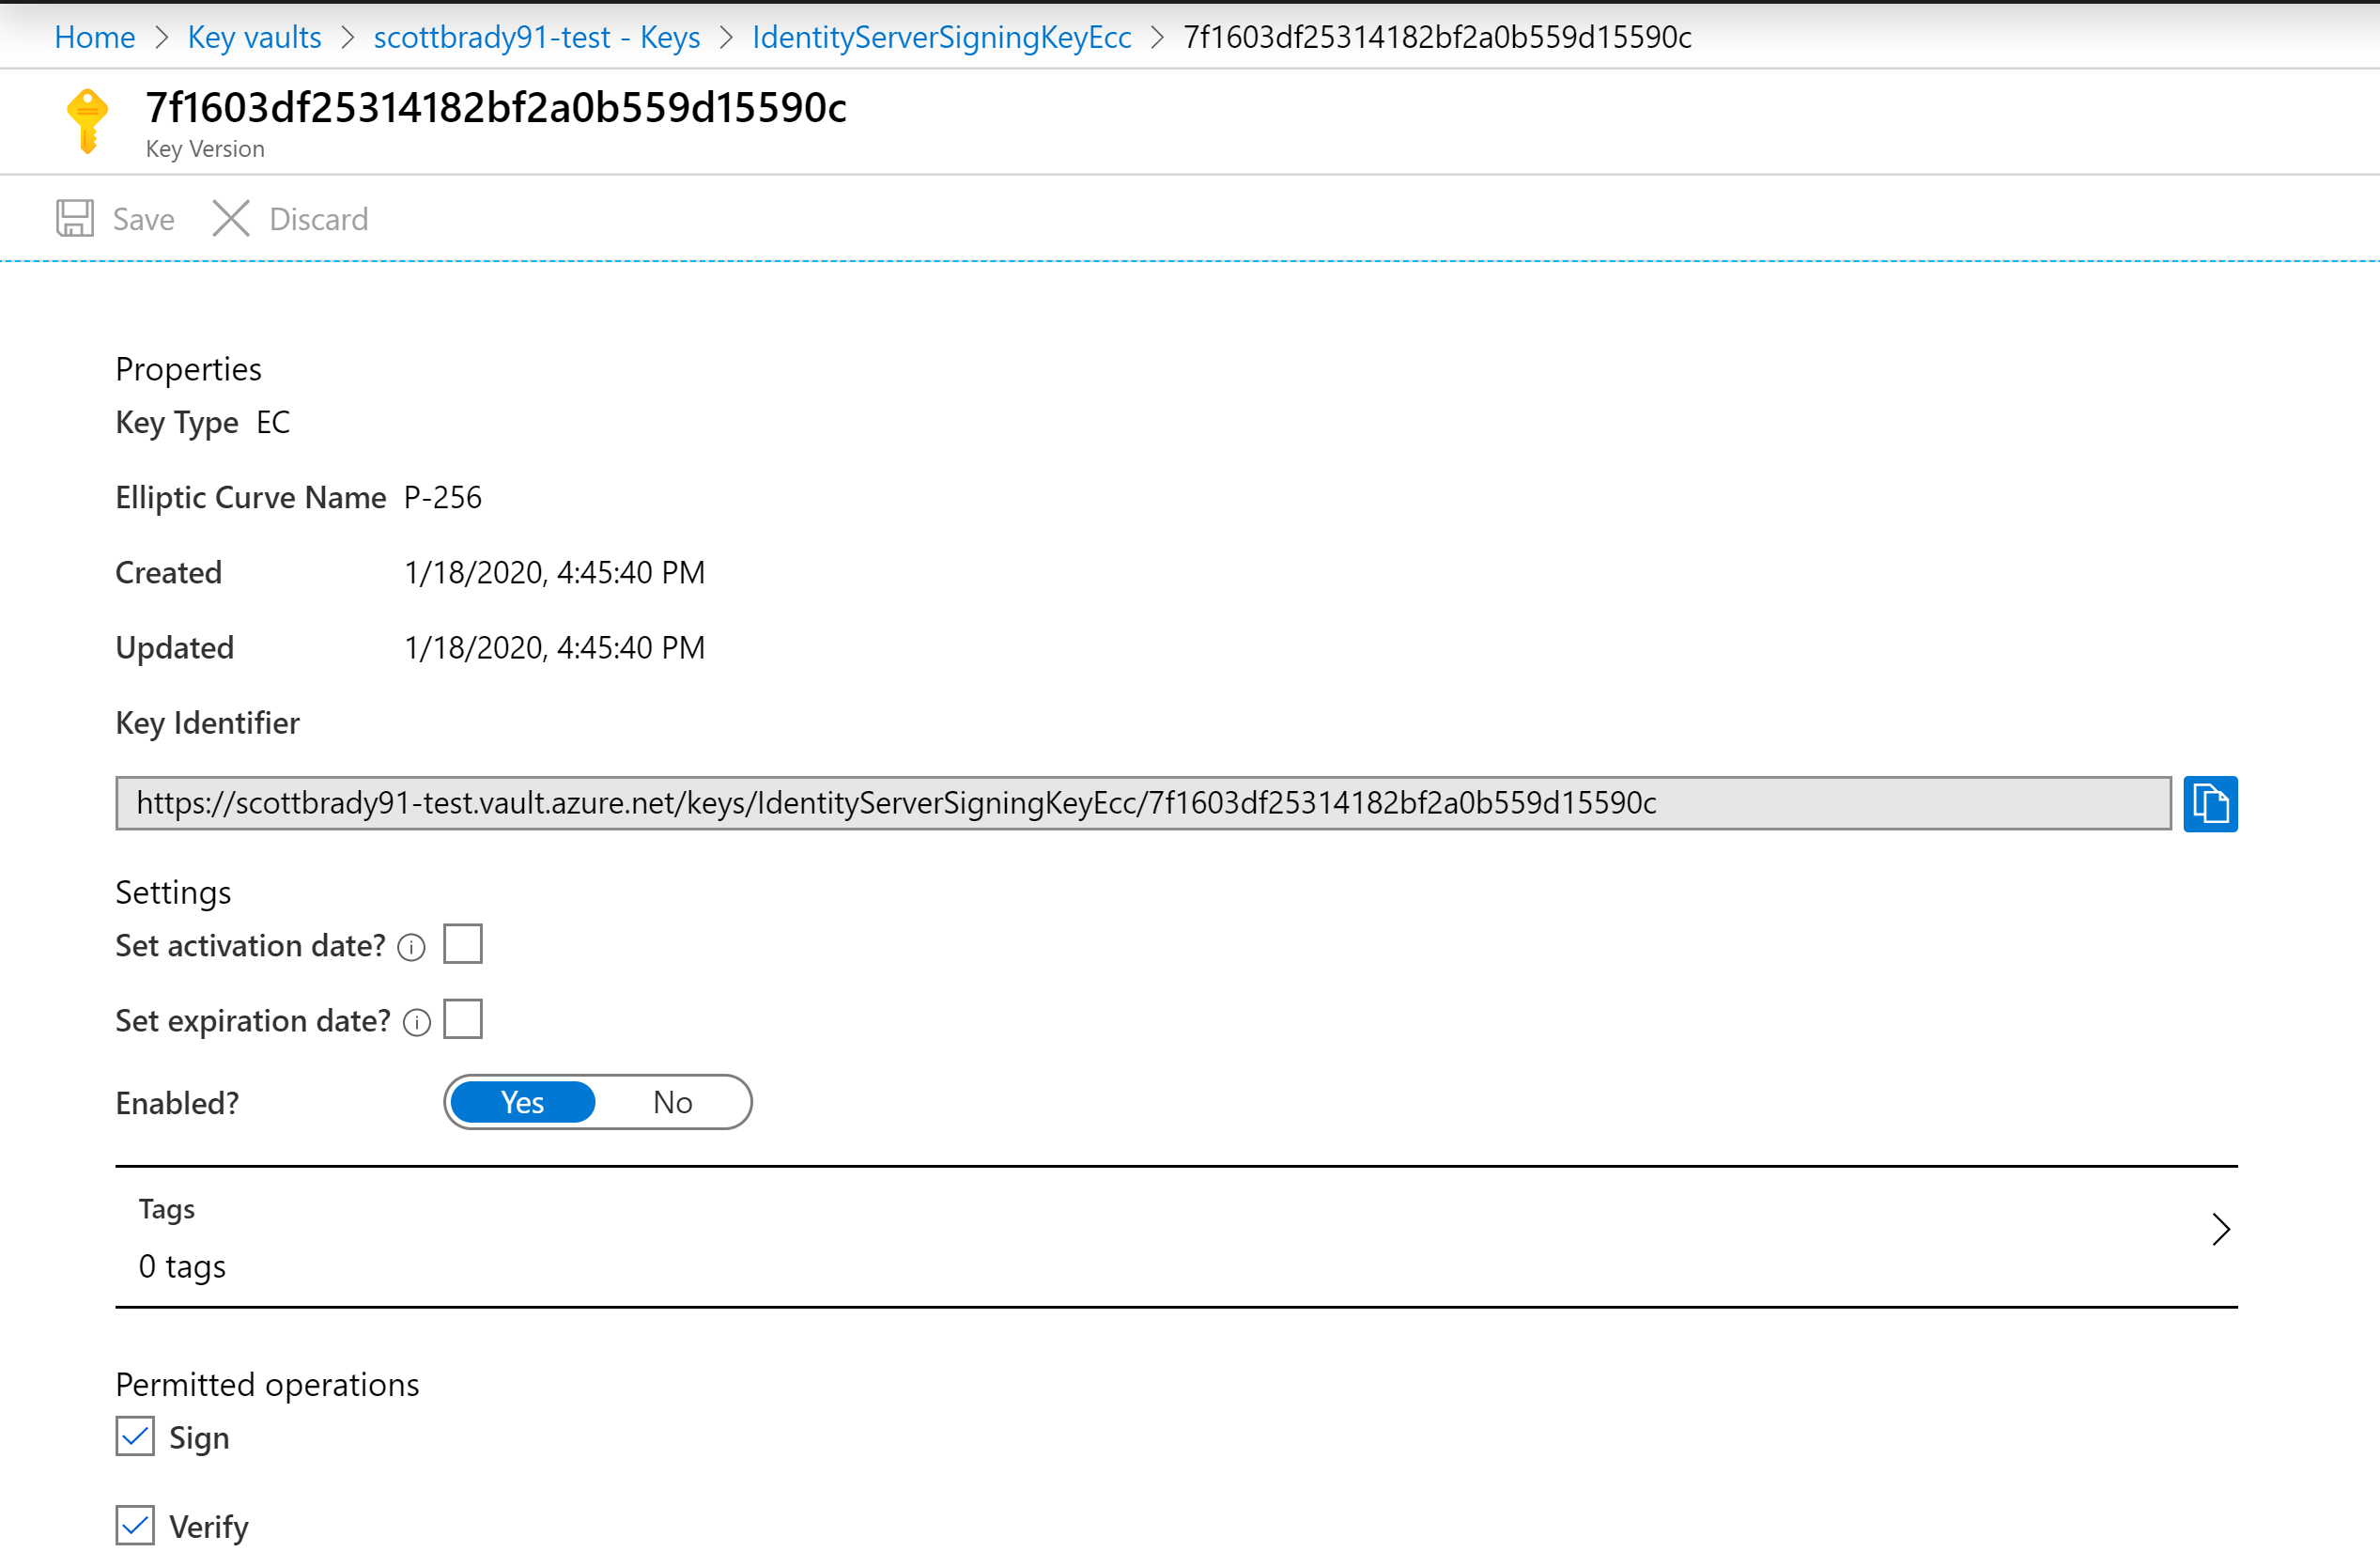
}I set the key ID to the key’s version number, for example “7f1603df25314182bf2a0b559d15590c”. Otherwise, the key ID that Azure Key Vault gives you contains the key vault’s URL, for example, “https://scottbrady91-test.vault.azure.net/keys/IdentityServerSigningKeyEcc/7f1603df25314182bf2a0b559d15590c”.
With your signing key and algorithm in hand, you can then call the usual IdentityServer registration:
services.AddIdentityServer()
	// existing registrations
	.AddSigningCredential(key, algorithm);
Even though you are telling IdentityServer that this is your signing key, it only contains a public key. Using this method allows us to take advantage of some of IdentityServer’s default implementations, such as JWT header creation, token introspection, and JWKS generation. However, in its current state, it will throw an exception if you try creating any tokens. Let’s solve that.
Token Signing
To change how IdentityServer4 signs tokens, you’ll need your own implementation of ITokenCreationService.
Starting from scratch is an option, but you can take advantage of the existing implementation DefaultTokenCreationService, which has the following methods:
Task<string> CreateTokenAsync(Token token);
Task<JwtHeader> CreateHeaderAsync(Token token);
Task<JwtPayload> CreatePayloadAsync(Token token);
Task<string> CreateJwtAsync(JwtSecurityToken jwt);
CreateTokenAsync is the entry point and calls the other three methods in order (header, payload, and JWT).
In this case, all you care about is how the JWT is created, the header & payload will be unchanged, so let’s override CreateJwtAsync.
public class KeyVaultTokenCreationService : DefaultTokenCreationService
{
    public KeyVaultTokenCreationService(ISystemClock clock, IKeyMaterialService keys, IdentityServerOptions options, ILogger<DefaultTokenCreationService> logger)
        : base(clock, keys, options, logger)
    {
    }

    protected override async Task<string> CreateJwtAsync(JwtSecurityToken jwt)
    {
        var plaintext = $"{jwt.EncodedHeader}.{jwt.EncodedPayload}";

        byte[] hash;
        using (var hasher = CryptoHelper.GetHashAlgorithmForSigningAlgorithm(jwt.SignatureAlgorithm))
        {
            hash = hasher.ComputeHash(Encoding.UTF8.GetBytes(plaintext));
        }

        var cryptoClient = new CryptographyClient(
            new Uri(""), // Key URI, e.g: https://scottbrady91-test.vault.azure.net/keys/IdentityServerSigningKey
            new ClientSecretCredential(
                tenantId: "",
                clientId: "",
                clientSecret: ""));

        var signResult = await cryptoClient.SignAsync(new SignatureAlgorithm(jwt.SignatureAlgorithm), hash);

        return $"{plaintext}.{Base64UrlTextEncoder.Encode(signResult.Signature)}";
    }
}
Here you are taking the JWT passed to you and manually generating the signature. You parse the value that needs to be signed “{base64url header}.{base64url payload}”, send that value off to Azure Key Vault, and then take the resulting signature, base64url encode it, and append it to your plaintext value to create your JWT.
This time, the URI that you give to the Azure Key Vault client needs to point to the key you want to use. In my case, I used the URL without the version number, for example: “https://scottbrady91-test.vault.azure.net/keys/IdentityServerSigningKey”.
To tell IdentityServer to use this new token creation service, simply register it in your DI after the call the AddIdentityServer.
services.AddIdentityServer(); // existing registrations ommited

services.AddTransient<ITokenCreationService, KeyVaultTokenCreationService>();
At this point, you should now be able to start using client applications and creating tokens using Azure Key Vault.
Next Steps
I hope it is evident that this is not production-ready code. At the very least, I’m seeing the following issues that need addressing.
Key Rollover
Currently, the sample code is loading the public key at startup. This means that if our private key within Azure Key Vault changes, we will not load in the new public key.
To allow the key vault to generate a new version, I can see you needing to implement your own ISigningCredentialStore and IValidationKeysStore, which can go and get the public key from key vault on every request with some caching or scheduling thrown in for performance.
Key Vault Client Re-Use
At the moment, the sample code is spinning up a new key vault client each time I perform an operation. I’m not 100% sure what the implication of this is or how re-usable these clients are, especially with the newer style of Azure Key Vault SDK. It looks like the Azure Key Vault data protection implementation registers a singleton client, but I’d be interested to hear what you end up using.
Azure Service Principal
This sample code made use of the OAuth client credentials flow to access the key vault; however, in production, I would recommend using an Azure Service Principal for authorizing access. That way, you can allow an application to access your vault without the need for shared secrets.
Source Code
The source code running this sample code is available on GitHub. You’ll have to supply your own Key Vault though.