
A common Umbraco use case is to use your existing SSO solution to log into the Umbraco backoffice. For example, this could be using your custom IdentityServer solution or your company’s Azure AD. Thankfully, Umbraco 9 has significant improvements for its backoffice that enable you to use existing ASP.NET Core authentication handlers for backoffice users.
In this article, you’ll see how to use any OpenID Connect identity provider, such as IdentityServer, Azure AD, Auth0, or Okta, to authenticate users in Umbraco’s backoffice.
Check out my other article if you’re looking for Umbraco frontend membership SSO.
Getting started with Umbraco
To get started, you’ll need a working instance of Umbraco 9 or above, running on ASP.NET Core. The simplest way to do this is to use the Umbraco templates. I found it easiest to use a template with SQL CE, which will allow you to dotnet run out of the box:
dotnet new umbraco --SqlCeGive the site a run, set up your admin user, and allow Umbraco to complete installation.
Configuring an OpenID Connect provider for the Umbraco backoffice
Let’s start by installing your required dependency, Microsoft’s OpenID Connect authentication handler:
dotnet add package Microsoft.AspNetCore.Authentication.OpenIdConnectIn your Startup file, you’ll see Umbraco has its own set of registrations. By default, this will set up Umbraco’s backoffice, the backoffice user store, and the backoffice authentication handlers (a cookie). You’ll need to build on this to add an external identity provider.
Thankfully, Umbraco comes with an extension method to add new ASP.NET Core authentication handlers straight onto the Umbraco backoffice with AddBackOfficeExternalLogins.
AddBackOfficeExternalLogins gives you access to BackOfficeAuthenticationBuilder, an extended version of ASP.NET’s AuthenticationBuilder.
This means that you get access to your usual authentication handler registrations such as AddOpenIdConnect, AddGoogle, AddFacebook, and AddMicrosoftAccount, just like any other ASP.NET Core website.
// "Umbraco.oidc"
var scheme = $"{Constants.Security.BackOfficeExternalAuthenticationTypePrefix}oidc";

services.AddUmbraco(_env, _config)
    .AddBackOffice()
    .AddBackOfficeExternalLogins(loginsBuilder =>
        loginsBuilder.AddBackOfficeLogin(authBuilder =>
            authBuilder.AddOpenIdConnect(scheme, "OpenID Connect", options =>
            {
                // using IdentityServer's demo installation
                options.Authority = "https://demo.identityserver.io";
                options.ClientId = "interactive.confidential";
                options.ClientSecret = "secret";

                options.CallbackPath = "/signin-oidc";
                options.ResponseType = "code";
                options.ResponseMode = "query";
                options.UsePkce = true;

                // get user identity
                options.Scope.Add("email");
                options.GetClaimsFromUserInfoEndpoint = true;
            })))
    .AddWebsite()
    .AddComposers()
    .Build();
Above is the ideal OAuth 2.1/OpenID Connect 1.0 configuration using the authorization code flow and PKCE.
Note that the authentication scheme must start with “Umbraco.”, otherwise you’ll get the following exception:
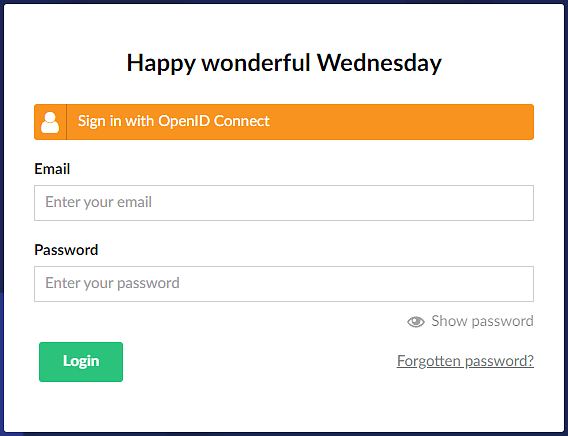
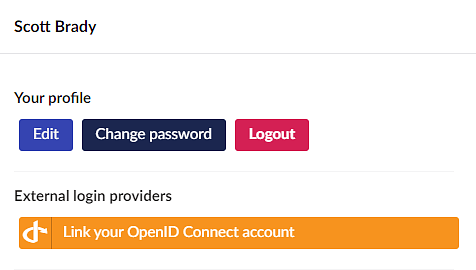
InvalidOperationException: The authenticationScheme is not prefixed with Umbraco. The scheme must be created with a call to the method SchemeForBackOfficeThe above registrations will result in a new login option on Umbraco’s backoffice login screen and the ability for backoffice admins to link their existing local account to an account in the external identity provider.
To change the icon and styling of the external auth button, you can pass in another action into AddBackOfficeLogin, this time configuring BackOfficeExternalLoginProviderOptions.
services.AddUmbraco(_env, _config)
    .AddBackOffice()
    .AddBackOfficeExternalLogins(loginsBuilder =>
        loginsBuilder.AddBackOfficeLogin(authBuilder =>
            authBuilder.AddOpenIdConnect("Umbraco.oidc", "OpenID Connect", options =>
            {
                // existing config
            }),
            providerOptions => providerOptions.Icon = "fab fa-openid"))
    .AddWebsite()
    .AddComposers()
    .Build();
You can also use these options to enable and configure the auto-linking of accounts or even disable local username & password authentication altogether. For more information on auto-linking, check out the Umbraco documentation; for disabling local authentication, keep scrolling.
IdentityServer & Umbraco
If you’re integrating with IdentityServer, here’s the client configuration for the above Umbraco website. Check out the sample code for a working implementation.
new Client
{
    ClientId = "umbraco-backoffice",
    ClientSecrets = { new Secret("secret".Sha256()) },
    AllowedGrantTypes = GrantTypes.Code,
    RequirePkce = true,
    RedirectUris = { "https://localhost:44362/signin-oidc" },
    AllowedScopes = { "openid", "profile", "email" }
}
Azure AD & Umbraco (or any other authentication scheme)
Since Umbraco exposes the default ASP.NET Core authentication builder, you can use this approach with any supported ASP.NET Core remote authentication handler. For instance, you can replicate the above code to work with Azure AD, like so:
.AddBackOfficeExternalLogins(loginsBuilder =>
    loginsBuilder.AddBackOfficeLogin(authBuilder =>
            authBuilder.AddOpenIdConnect(scheme, "Azure AD", options =>
            {
                // your Azure AD tenant
                options.Authority = "https://login.microsoftonline.com/ff191596-4ffd-4c77-93e7-6167a5756569/v2.0";
                options.ClientId = "bf5597e9-593f-4d90-8fab-bcfa2fda581c";
                options.ClientSecret = "W2O7Q~ECiZGGgODaCj2O1o94iyn0-VFIaZFHM";

                options.CallbackPath = "/signin-oidc";
                options.ResponseType = "code";
                options.ResponseMode = "query";
                options.UsePkce = true;

                // get user identity
                options.Scope.Add("email");
                options.GetClaimsFromUserInfoEndpoint = true;
            })))
I’m trying to stress that there are no further Umbraco specifics to adding an external identity provider. So, if you keep your Googling to just “ASP.NET Core”, you’ll find a lot more articles and samples for your authentication method of choice. It would even work out of the box with SAML!
Disabling backoffice local login
Now that you’ve integrated Umbraco’s backoffice with your external identity provider, you’ll likely want to disable the default local username and password authentication. After all, if you’ve enabled SSO with your corporate directory that enforces strong MFA, I doubt you’ll want to leave an authentication bypass hanging around. Thankfully, this is also available out of the box with Umbraco 9 onwards.
To disable local login, you can set the DenyLocalLogin option on BackOfficeExternalLoginProviderOptions to true:
providerOptions => providerOptions.DenyLocalLogin = trueYou can even take things a step further by disabling the login page entirely, redirecting directly to the identity provider:
providerOptions =>
{
    providerOptions.DenyLocalLogin = true;
    providerOptions.AutoRedirectLoginToExternalProvider = true;
}
Source Code
You can find completed sample code in my GitHub samples repository. This sample includes a demo IdentityServer implementation for you to use as your identity provider. Just remember to keep an eye on those redirect URIs (they’re case, and therefore port, sensitive)!