
IdentityServer3 is no longer supported. I highly recommend that you consider moving to IdentityServer4 or Duende IdentityServer.
Welcome to the first part of my Identity Server 3 Implementation Guide. To start with we'll walk through a standalone implementation of Identity Server 3 using the implicit flow, ready for a basic MVC application to authenticate against it. This initial post will be similar to the starter documentation with the bonus of using a standalone implementation and taking the time to talk through some of the concepts in more detail. We'll start with the implicit flow as this is the simplest to demonstrate, and the default for IdentityServer, using future posts to explain the hybrid flow and authorizing access to an API.
Installation
To start off we'll need an empty ASP.NET application, no templates needed. Make sure you enable SSL through the project properties, and set this HTTPS URL as the project default.
The following two NuGet packages are necessary for installing Identity Server 3:
install-package IdentityServer3
install-package Microsoft.Owin.Host.Systemweb
Where Microsoft.Owin.Host.Systemweb is being used to pull in the necessary packages for hosting our OWIN pipeline in IIS (Identity Server runs as an Owin/Katana component).
Configuration
For this demonstration we are going to use the In-Memory configuration stores provided by Identity Server. These stores require a collection to initialize, which we can create now.
Clients
The clients class is a collection of OAuth and OpenID Connect clients. Here we can control how each client application can interact with Identity Server and the URIs that can be used. The client we configure here will be used in part 2 of this guide.
public static class Clients {
    public static IEnumerable<Client> Get() {
        return new List<Client> {
            new Client {
                ClientId = "implicitclient",
                ClientName = "Example Implicit Client",
                Enabled = true,
                Flow = Flows.Implicit,
                RequireConsent = true,
                AllowRememberConsent = true,
                RedirectUris =
                  new List<string> {"https://localhost:44304/account/signInCallback"},
                PostLogoutRedirectUris =
                  new List<string> {"https://localhost:44304/"},
                AllowedScopes = new List<string> {
                    Constants.StandardScopes.OpenId,
                    Constants.StandardScopes.Profile,
                    Constants.StandardScopes.Email
                },
                AccessTokenType = AccessTokenType.Jwt
            }
        };
    }
}
The ClientId is the unique ID of the client. This will be referenced by any future client applications in order to interact with the Identity Server.
ClientName will be the identifier displayed on any consent screens.
Enabled allows you to enable and disable individual clients.
Flow is an enum that sets the OpenID Connect flow for the client. Available flows are: Implicit, AuthorizationCode, Hybrid, ClientCredentials, ResourceOwner and Custom (default is Implicit).
RequireConsent and AllowRememberConsent activate and control the consent screen for logins. These both default to true.
RedirectUris is a collection of URIs that tokens and authorisation codes can be returned to for this client. If a URI is not on this list, then it cannot interact with Identity Server using this client.
PostLogoutRedirectUris is a collection of URIs that Identity Server can redirect to upon logout. Otherwise the user will stay on the default logout success screen within the Identity Server.
ScopeRestrictions is a list of OpenID Connect scopes allowed to be requested and returned to this client. We can take advantage of the predefined enums provided by Identity Server here. Not setting this allows all scopes to be retrieved (defaults to an empty list).
AccessTokenType defaults to JWT. The other option for this is Reference, which stores the JWT locally and instead sends the client a reference to it, allowing you to easily revoke the token.
Any tokens lifetimes have been left to the defaults, which you can find in the official documentation.
Scopes
Now we need to configure the scopes that Identity Server can provide. These scopes will also display on the OpenID Connect discovery document.
public static class Scopes {
    public static IEnumerable<Scope> Get() {
        return new List<Scope> {
            StandardScopes.OpenId,
            StandardScopes.Profile,
            StandardScopes.Email,
            StandardScopes.Roles,
            StandardScopes.OfflineAccess
        };
    }
}
Cert
For the purpose of this example we'll use the example signing certificate from the IdentityServer3 samples repository. If you are going to use this method, do not forget to add the certificate to your project and include it as an embedded resource.
internal static class Cert {
    public static X509Certificate2 Load() {
        var assembly = typeof(Cert).Assembly;
        using (var stream = assembly.GetManifestResourceStream(
            "ScottBrady91.IdentityServer3.Example.Configuration.idsrv3test.pfx")) {
            return new X509Certificate2(ReadStream(stream), "idsrv3test");
        }
    }
    private static byte[] ReadStream(Stream input) {
        var buffer = new byte[16 * 1024];
        using (var ms = new MemoryStream()) {
            int read;
            while ((read = input.Read(buffer, 0, buffer.Length)) > 0) {
                ms.Write(buffer, 0, read);
            }
            return ms.ToArray();
        }
    }
}
Note that it isn't recommended that you embed the cetificate like this. In a production environment you should be adding this to your certificate store. See instructions here for using the Azure Websites certificate store.
Users
Before we go implementing a proper user service, for this demonstration we'll instead use the in-memory service that requires a collection of InMemoryUser.
These are suitable for development only.
public static class Users {
    public static List<InMemoryUser> Get() {
        return new List<InMemoryUser> {
            new InMemoryUser {
                Subject = "1",
                Username = "Scott Brady",
                Password = "Password123!",
                Claims = new List<Claim> {
                    new Claim(Constants.ClaimTypes.GivenName, "Scott"),
                    new Claim(Constants.ClaimTypes.FamilyName, "Brady"),
                    new Claim(Constants.ClaimTypes.Email, "[email protected]"),
                    new Claim(Constants.ClaimTypes.Role, "Badmin")
                }
            }
        };
    }
}
Startup
All that's left now is to add IdentityServer to the Owin startup class.
public sealed class Startup {
    public void Configuration(IAppBuilder app) {
        app.Map(
            "/core",
            coreApp => {
                coreApp.UseIdentityServer(new IdentityServerOptions {
                    SiteName = "Standalone Identity Server",
                    SigningCertificate = Cert.Load(),
                    Factory = new IdentityServerServiceFactory()
                            .UseInMemoryClients(Clients.Get())
                            .UseInMemoryScopes(Scopes.Get())
                            .UseInMemoryUsers(Users.Get()),
                    RequireSsl = true
                });
            });
    }
}
Here we are using the InMemory Client Store, Scope Store and User Service.
These are meant for development use only. In production you would see a User Service implemented using a user store such as ASP.NET Identity and Client and Scope Stores using Entity Framework.
In memory storage is volatile, as you would expect.
You don't have to map Identity Server to a route like this, however I've found it can keep the OWIN pipeline simple and clean when using other OWIN middleware, especially if you are emmbedding Identity Server into another project.
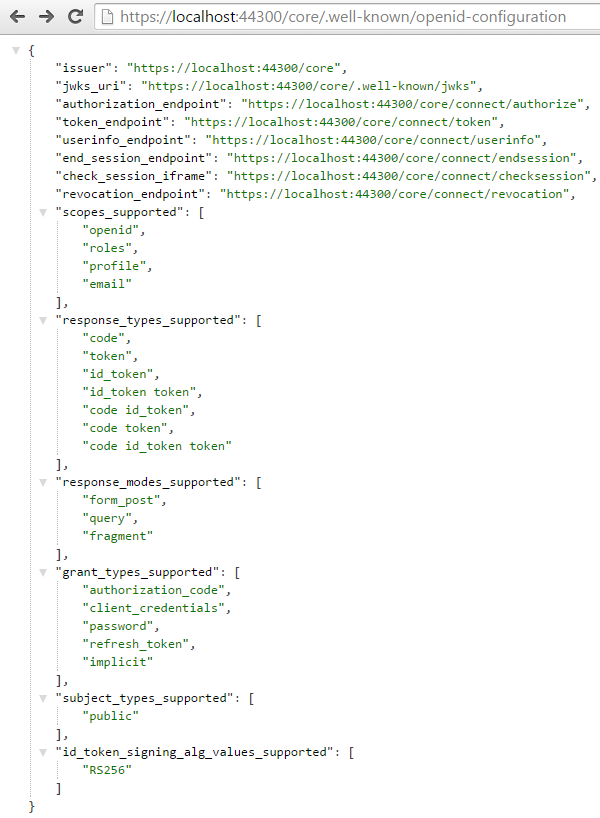
We can now start the project and check out the OpenID Connect discovery endpoint at /.well-known/openid-configuration
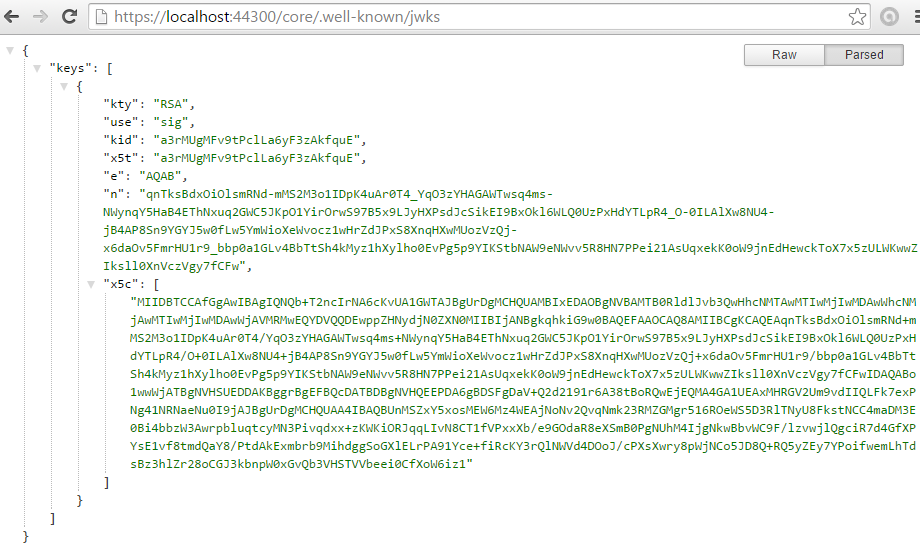
We can also confirm the certificate has taken and is open to discovery using the jwks endpoint /.well-known/jwks
We also need to enable RAMMFAR in the web.config, or else the IdentityServer's embedded resources will not load correctly.
<system.webServer>
  <modules runAllManagedModulesForAllRequests="true" />
</system.webServer>
See below for the difference this causes:
Source Code
I've made a repository for the working source code covered in these posts that will evolve as I expand on each topic. You can find this repository here on GitHub. Feel free to point out any mistakes or assumptions.
In the next part of this guide I will cover the various ways of interacting with the implementation above, using both explicit and automatic discovery.
Identity Server 3 v2
In August 2015 the Identity Server team realesed version 2.0.0 of Identity Server 3. This new package included some minor breaking changes in the usual configuration options, but the most notable is the change of namespace from Thinktecture.IdentityServer to just IdentityServer3. The Identity team has dropped the Thinktecture prenomen from the entire Identity series of IdentityServer, IdentityManager and IdentityModel.
You can read more about Identity Server 3 v2.0.0 in the initial announcement post and the release change log.
v2 Changes
Changes to my example code were pretty minimal, with no changes necessary in our Users and Scopes classes.
In our Clients class, ScopeRestrictions has been made clearer and changed to AllowedScopes.
By default clients no longer have access to any scopes, forcing developers to explicitly state their scopes.
I've noticed this was causing some confusion with people in the past, so hopefully this will clear things up.
Also in this class, ClientSecret has been renamed to just Secret.
Our OWIN Startup class also has a few changes with the InMemoryFactory being removed.
We now have to new up a IdentityServerServiceFactory using the 'UseInMemory' extension methods to assign any InMemory classes.
There are further breaking changes planned in 2016 with v3.
Sources- Blog Post GitHub Repository
- Identity Server 'Getting Started' Documentation
- Identity Server 3 Repository
- Identity Server 3 Samples Repository
Other articles in the series: